
How to Take Graduation Photos

Graduation portrait photography is a great opportunity to enhance your portrait skills, create meaningful keepsakes for your client, and enjoy the process. However, to ensure a smooth and successful shoot, it’s essential to plan ahead. This guide will help you prepare for a well-executed graduation photo session.
Scout the Locations
Like any other portrait session, several behind-the-scenes details must be sorted out before the shoot begins.
Start by communicating with your client to determine whether they prefer to take photos on campus, at an off-site location, or a combination of both. If multiple locations are an option, consider discussing any additional time and cost involved.
If part of the session takes place on campus, familiarize yourself with the area beforehand. While an online search can help identify popular photo spots, speaking with students or faculty can provide valuable insights. Your client may have specific locations in mind, but having a few recommendations of your own ensures a smooth workflow.
Pro Tip: Walk around the campus before the shoot and drop virtual pins on a mapping app to mark potential photo locations. This will save time and help with navigation on the day of the session.
Additionally, coordinate a clear meeting point with your client and research parking options in advance. Many campuses have limited visitor parking, so having a plan in place will prevent last-minute confusion.
Understand Graduation Attire
Knowing the traditional graduation outfit in advance allows you to guide your client effectively. If the shoot takes place before the ceremony, they may need assistance in making sure everything looks polished and well-arranged. Here’s an overview of the common elements of graduation attire:
(Continue with attire details as needed…)
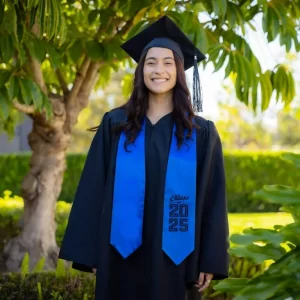
Photo by Justin Hein.
Cap and Tassel
Wearing the graduation cap correctly is simple but requires attention to detail. The back of the cap is slightly deeper than the front, and it should be worn like a regular hat once properly aligned. The pointed end should extend straight out in front, creating a diamond shape, with the top of the cap sitting parallel to the ground.
The tassel is attached to the button at the top of the cap. Before the ceremony, it is traditionally placed on the right side. After the graduate officially receives their diploma, they move the tassel to the left side.
Gown
The graduation gown is also straightforward to wear, as most are designed with a front zipper. For variety in your photos, consider capturing shots with the gown both zipped and unzipped.
Stole
A stole is a sash draped around the graduate’s neck during the ceremony. As the photographer, ensure both ends are evenly positioned throughout the shoot. If the stole features an emblem or logo, make sure it is clearly visible in the photos.
Cords
Cords are similar to the stole but are typically thinner and worn draped around the neck, hanging down on both sides. Check that they are even and positioned neatly for a polished appearance in the final images.
Develop a Plan
Graduation photography requires more preparation than standard portrait sessions. To ensure a smooth experience, start by communicating with your client via email or phone. If you’re comfortable, share your phone number for quick coordination on the day of the shoot.
First, finalize the shoot locations. Work with the client to determine their preferences, keeping in mind that most graduates opt for at least a few photos on their campus. Since campuses can be crowded during the week, consider scheduling the session on a Friday, Saturday, or Sunday evening for a more relaxed setting.
Timing is crucial for optimal lighting. Aim for an hour before sunset to achieve soft, natural light. Using tools like PhotoPills or The Photographer’s Ephemeris can help you determine the best lighting conditions for your location.
Discuss outfit choices with your client in advance. Encourage them to wear professional or stylish clothing under the gown, allowing for a mix of looks during the session. Remind them to remove their graduation attire from its packaging beforehand and smooth out any wrinkles, including the cap and stole.
Take a moment to ask about the graduate’s future plans. They may want a few shots in apparel representing their next chapter, whether it’s a university sweatshirt or an outfit related to their new career. This adds a personal touch and variety to the shoot.
Finally, confirm all details with your client a day or two before the session. A quick check-in ensures they’re prepared and provides an opportunity to answer any last-minute questions.
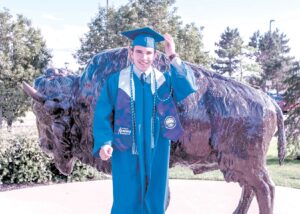
A graduation photo with a school mascot sculpture. Photo by Justin Hein.
Essential Equipment for Graduation Photography
One of the great things about graduation portraits is that they don’t require an extensive amount of specialized gear. However, having the right equipment can significantly enhance the quality of your photos. Here are some key recommendations to consider.
Camera
A DSLR or mirrorless camera with interchangeable lenses is ideal for graduation portraits, as it allows for greater control over settings and creative flexibility. However, any camera that provides manual control—especially over aperture—can produce excellent results.
Lenses
Portrait photography benefits from lenses with a wide maximum aperture, as they create a beautifully blurred background (bokeh) that makes the subject stand out.
For individual portraits, a lens with an aperture of f/2.8 or wider is recommended. A 50mm f/1.8 prime lens is an excellent and budget-friendly choice, offering sharp image quality and pleasing bokeh. Other strong options include 85mm and 105mm prime lenses, as well as a versatile 70-200mm zoom lens.
You typically don’t need more than two lenses for a graduation shoot. A well-paired set, such as a 50mm and a 105mm, provides a good range of focal lengths. Some photographers prefer to carry just one prime lens for simplicity.
Lighting
Proper lighting can elevate the overall look of your graduation portraits.
If shooting in bright outdoor conditions, a reflector can help by directing light onto your subject, reducing harsh shadows, and enhancing natural illumination. If you have an assistant, they can hold and adjust the reflector for the best effect. Be sure to practice using it beforehand to ensure efficiency during the shoot.
For those experienced with off-camera flash, incorporating a properly diffused flash can add depth and dimension to the portraits. While not essential, flash can help highlight the subject and create a polished, professional look. However, the most important factor is understanding and adapting to the natural lighting conditions—stunning portraits can still be achieved without additional lighting equipment.
A portrait captured with an off-camera flash. Photo by Justin Hein.
Additional Considerations
Many graduates will want a few portraits without their cap, so it’s a good idea to bring a comb or brush to tidy up their hair between shots. A small mirror can be helpful, though using a phone’s front camera works just as well for quick touch-ups.
If your client is interested in incorporating props, discuss their preferences beforehand. Some popular options for graduation portraits include school merchandise, celebratory banners, or even a bottle of sparkling cider as a playful alternative to champagne. Be mindful of location rules regarding beverages to avoid any issues.
Tips for Capturing Stunning Graduation Photos
Once your client is dressed in their neatly pressed graduation attire, it’s time for the fun part—getting creative with your shots!
If they’re unsure about where to start, take them to one of the pre-scouted locations. Encourage a mix of poses, including standing, sitting, and leaning, to create a variety of looks. A wide aperture (around f/2.8 or wider) will help produce a beautifully blurred background, making the subject stand out.
As you move through different locations, periodically show your client a few images to gauge their preferences. This not only builds confidence but also enhances communication during the session.
When capturing seated poses, avoid having the graduate face the camera straight on. Instead, angle their torso slightly for a more dynamic and flattering composition. Ask if they have a preferred side for their photos, and incorporate candid moments to add a natural, spontaneous feel.
Vary the framing of your shots as well. Capture a mix of close-ups, mid-range portraits, and full-body images to ensure a diverse selection of final photos.
Additionally, experiment with different combinations of graduation attire. Start with the full ensemble, then take some shots with just the cap and tassel, and others in their formal clothing without the gown. This approach adds variety and personalization to the session.
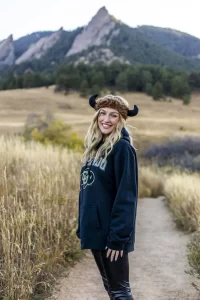
A graduation photo shot in nature with the subject wearing college apparel. Photo by Justin Hein.
Make It Fun!
Encourage your client to incorporate movement into their photos for a more dynamic feel. Have them toss their cap in the air while you use a fast shutter speed to freeze the moment perfectly. Seek out unique or humorous backdrops—statues, murals, or quirky campus landmarks can add personality to the shoot. If the school has a mascot, challenge yourself to creatively work it into the photos for an extra touch of school spirit.
Another great option is offering group graduation sessions. Not only is this more efficient for you, but graduates tend to feel more relaxed and natural when posing with their friends. Group sessions create perfect opportunities for candid, joy-filled shots that capture genuine laughter and celebration.
Final Thoughts
Graduation photography requires thoughtful planning, but it’s ultimately a fun and rewarding experience. Stay in close communication with your client to ensure everything runs smoothly, and clarify details in advance to avoid any last-minute surprises. Most importantly, keep the session lighthearted and enjoyable. You’re capturing a milestone moment in someone’s life—make it as memorable as possible!
Now that you’ve mastered the art of graduation portraits, maybe it’s time to book a session for yourself!