
Capturing Stunning Photos of the Geminid Meteor Shower
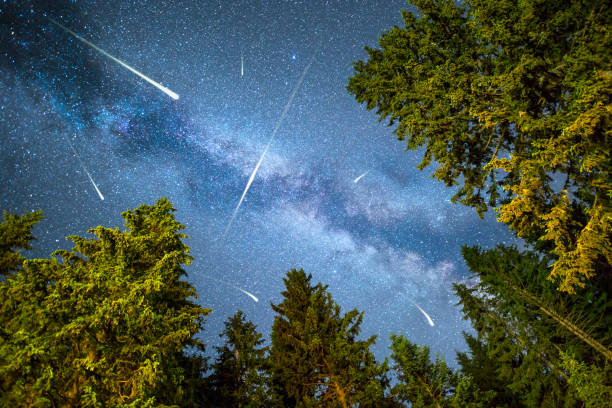
A view of a Meteor Shower and the Milky Way with a pine trees forest illuminated in the foreground. Night sky nature summer landscape. Perseid Meteor Shower observation.
The Geminid meteor shower is one of the most reliable and spectacular celestial events of the year. In this guide, we’ll walk you through everything you need to know—from preparation and shooting techniques to editing tips—to successfully capture this stunning meteor display.
The Geminid meteor shower occurs annually in mid-December and is unique in that it originates from an asteroid rather than a comet, making it one of only two meteor showers with this distinction.
For photographers, the Geminids offer an incredible opportunity, with up to 120 to 160 meteors per hour at their peak. However, photographing a meteor shower presents significant challenges. Not only must you capture well-exposed images of the night sky—dealing with issues like focus and sharpness during long exposures—but you also need precise timing to capture a meteor streaking across the frame.
Thankfully, we’re here to simplify the process. This guide covers essential tips for locating meteors, checking weather conditions for optimal visibility, selecting the right gear, and using the best camera settings to maximize your chances of success. We’ll also provide a brief overview of how to create a composite image using post-processing techniques. But first, let’s determine where to aim your camera.
How to Find the Geminid Meteor Shower
As the name suggests, the Geminids originate near the Gemini constellation, though meteors can appear across the sky. Around mid-December, Gemini rises in the northeast and becomes more prominent as the night progresses. To pinpoint its exact location, use a night sky app on your smartphone or computer. We recommend Stellarium, a user-friendly tool available for desktop and mobile, allowing you to search for constellations, meteor showers, and adjust for time and date with ease.

If you prefer a more traditional approach over using technology, you can navigate to the Gemini constellation using the stars. In the Northern Hemisphere, start by locating Ursa Major (commonly known as the Big Dipper). Draw an imaginary line from the two end stars—beginning at Merak and extending upward through Dubhe—until you reach the next bright star. This is Polaris, also known as the North Star, which marks the tail of Ursa Minor. Once you’ve found Polaris, identifying the northeast direction becomes much easier.
Essential Photography Gear for Capturing the Geminid Meteor Shower
While it may be tempting to simply grab your camera and head outside, keep in mind that in the Northern Hemisphere, the Geminid meteor shower occurs during winter. That means long hours in cold, dark conditions. To ensure a successful and comfortable shoot, it’s important to pack the right essentials before heading out.
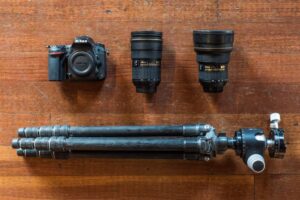
A sturdy tripod is essential for photographing the Geminids, as long exposures require complete stability. I recommend using a tripod with a ball head, which allows for flexible shooting angles. Since the Geminids can appear across the sky, with a concentration near Gemini, a wide-angle lens—preferably 24mm or wider—is ideal. For the best results, choose a lens with a fast aperture, such as f/2.8 or lower, to capture more light.
How to Capture Meteor Showers
The key technique for photographing meteors is to take continuous shots in succession, increasing the chances of capturing a frame with meteors. Later, these images can be combined in editing software to create a composite showcasing multiple meteors in a single final image.
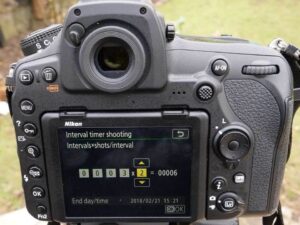
If your camera has a built-in interval timer, a basic external shutter release will suffice to trigger the camera without physically touching it. If not, using the self-timer function can help minimize vibrations. However, if your camera lacks an intervalometer, investing in an external one is recommended. This device will automate the process, taking a sequence of images without requiring manual input, reducing camera shake and improving efficiency.
Monitor Weather Conditions
Clear skies are crucial for meteor photography. Even with the best setup, clouds can obstruct visibility, making all efforts futile. Check weather forecasts in advance, especially if traveling to a remote location to escape light pollution, ensuring optimal conditions for your shoot.
Keep in mind that weather forecasts tend to be more regional than local, meaning they may not always provide accurate predictions for specific locations. If there’s even a small chance of clear skies during the peak viewing period, it may be worth heading out—sometimes, patience and persistence pay off with unexpected breaks in cloud cover.
Recommended Camera Settings for Capturing the Geminid Meteor Shower
For this shoot, always use manual mode. Semi-automatic modes like shutter priority or aperture priority can adjust exposure settings unpredictably throughout the session due to changes in cloud cover or light pollution. This inconsistency makes it difficult to blend images seamlessly during post-processing. Keeping all settings locked in manual mode ensures uniform exposure, making it easier to create a composite image later.
Camera settings will vary depending on sky darkness, light pollution, and your lens’s maximum aperture. However, a good starting point is an aperture of f/2.8, a shutter speed of 5 seconds, and an ISO of 1000 or higher. Be sure to disable long exposure noise reduction, as it can slow down your shooting process. Additionally, lock your white balance to maintain color consistency across all images. If you’re photographing in an area with significant light pollution, consider using Tungsten or Fluorescent white balance to counteract the orange glow. Most importantly, always shoot in RAW for maximum post-processing flexibility.
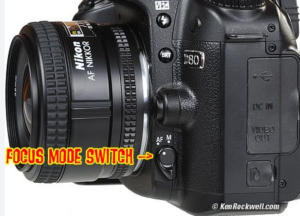
Achieving Sharp Focus
Autofocus struggles in low-light conditions, making it unreliable for capturing the night sky. Instead, manual focusing will yield the best results. Activate live view on your camera’s rear screen and point at a bright star or a distant streetlight. Switch to manual focus on your lens or camera body, then use the digital magnification feature to zoom in on the star. Carefully adjust the focus ring until the star appears as small and sharp as possible.
How to Edit Photos of the Geminid Meteor Shower
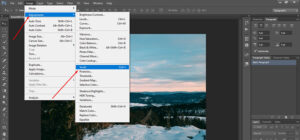
You can use any layer-based editing software for this process, but for this guide, we’ll walk through the steps in Adobe Photoshop. Start by importing your images to your computer and launching Photoshop. Then, go to File > Scripts > Load Files into Stack. Locate the images where meteors are clearly visible, select them, and click OK to load them into a single layered file.
Editing Your Geminid Meteor Shower Photos
Once all your images are stacked in layers, change the blending mode of every layer—except the bottom one—to Lighten. To do this efficiently, set one layer’s blending mode to Lighten, then right-click on it and select Copy Layer Style. Next, Shift + click to select the other layers, right-click again, and choose Paste Layer Style to apply the change across all selected layers.
If there’s a significant time gap between frames, the Earth’s rotation may cause the stars to shift, creating misalignment in the composite. To fix this, add a layer mask to the affected layers and mask out everything except the meteors, ensuring they remain visible without disrupting the star alignment.
For final refinements, use adjustment layers to make global edits non-destructively. Once satisfied, save your image as a Photoshop Document (PSD) to preserve layers for future adjustments. If sharing online, export a JPEG version, but keeping a PSD file allows for easy modifications later, especially if you’re still refining your editing skills.