It’s well known that reducing the aperture increases depth of field, but how much of a difference does it actually make? Here are some key insights about depth of field and how to maximize it effectively.
To double the depth of field, you can take any of the following approaches:
Double the f-number (increase by two stops, such as f/4 to f/8).
Shorten the lens focal length to 70% of its original value (e.g., switching from 100mm to 70mm). This is simple with a zoom lens.
Increase the distance between the camera and the subject by 1.4x.
You can also combine these adjustments. For instance, increasing the f-number by one stop while moving 1.2x farther from the subject will still double the depth of field.
This technique is particularly useful in macro photography, where achieving greater depth can be a challenge. If you’re already using a small aperture but need more depth, doubling the subject distance will actually quadruple the depth of field. While this may require cropping, modern high-resolution sensors ensure that even a cropped image retains sufficient detail. For reference, a 1,000-pixel width—about one-sixth of a 24MP image—is often more than enough for most uses. While focus stacking remains an option, simply increasing the distance might reduce your reliance on it significantly.
In a recent discussion on a photography forum, I demonstrated how a single image of a wristwatch, captured by stepping back and adjusting the aperture, achieved the same depth of field as a focus-stacked image compiled from 20 exposures. Many photographers hesitate to stop down their aperture due to concerns about diffraction-related softness. However, test shots reveal that f/16 remains impressively sharp, and while f/22 introduces slight softness, a touch of sharpening in post-processing easily restores detail.
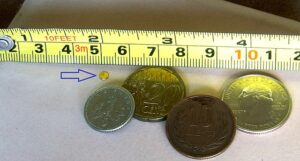
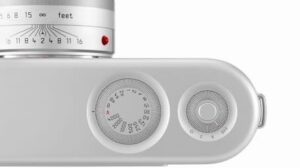
Close (left) and farther (right).
This ruler is positioned at an angle, with the right side appearing closer. All of these photos were taken at f/11. In the right photo, the entire camera was moved farther away, resulting in improved depth of field. Increasing the distance also helps minimize perspective distortion.
Close (left) and farther (right).
Above, the second image was taken from twice the distance. You can clearly see the increased depth of field by observing the ruler.
If you want to halve the depth of field, you can do any of the following:
Halve the f-number (open the aperture by two stops).
Increase the lens focal length by 1.4x.
Reduce the distance to the subject to 70% of the original.
A shallow depth of field is often desirable for portraits, but the ideal choice depends on artistic intent. Some stunning portraits include the subject in sharp focus while maintaining clear surroundings, adding depth to the composition.
The Depth of Field Myth
You may have heard countless times that a full-frame camera is essential for achieving a shallow depth of field. This is a misconception. You can achieve the same effect with smaller sensor formats simply by adjusting the f-number accordingly.
To match the depth of field of a full-frame camera:
Use one stop wider aperture for APS-C sensors.
Use two stops wider aperture for Micro Four Thirds.
For example, if a portrait is taken at 75mm f/2.8 on a full-frame camera, you can achieve the same depth of field and framing with:
APS-C: 50mm f/2
Micro Four Thirds: 37mm f/1.4
Smaller format lenses that provide equivalent results are often more affordable than their full-frame counterparts.
If background blur is your goal, the simplest solution is to position your subject in front of a distant background. You’ll be surprised by how effective this technique is.
Personally, I prefer shooting portraits at smaller apertures like f/8 or f/11—settings rarely used for subject isolation—because they ensure the entire subject remains in sharp focus. Instead of relying on an extremely shallow depth of field, I create background separation by carefully choosing a distant backdrop.
The portrait below was captured at f/11. Had I used the wider aperture settings from the previous examples, either the nose or ears would have fallen out of focus.
Understanding this principle can save you both money and weight. You don’t need to invest in an expensive, heavy f/1.4 lens just to achieve subject isolation. Any lens can create separation if the background is sufficiently distant.


 Close (left) and farther (right).