Mastering Exposure with the Sunny 16 Rule
The Sunny 16 Rule is one of the simplest yet most effective techniques in photography for achieving proper exposure. This rule provides a straightforward method to determine the correct shutter speed when shooting in bright sunlight with an aperture set to f/16.
The core principle of the Sunny 16 Rule is simple: On a clear, sunny day, set your aperture to f/16 and adjust your shutter speed to match the inverse of your ISO. For instance, if your ISO is 100, your shutter speed should be 1/100 seconds; if your ISO is 200, set your shutter speed to 1/200 seconds.
While this rule is designed for direct sunlight, it can also be adapted for different lighting conditions. By making small adjustments to the aperture, you can use it effectively even on cloudy or overcast days.
Continue reading to learn how to apply the Sunny 16 Rule in various lighting scenarios and improve your ability to estimate exposure without relying on a light meter.
Table of Contents
Applying the Sunny 16 Rule for Proper Exposure
When shooting landscape photos on a bright, sunny day, you can determine the correct shutter speed without relying on your camera’s automatic metering system by using the Sunny 16 Rule.
The rule is simple: When setting your aperture to f/16, your shutter speed should correspond to the reciprocal of your ISO. This means that if your ISO is 100, your shutter speed should be 1/100 seconds for proper exposure. Likewise, if your ISO is 800, your shutter speed should be adjusted to 1/800 seconds.
The Relationship Between Shutter Speed and ISO
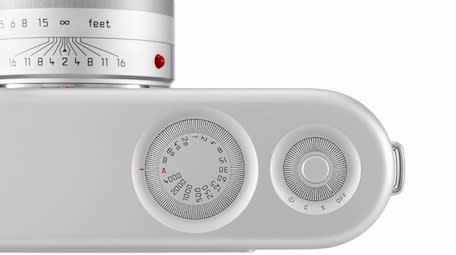
For beginners in photography, understanding shutter speed is essential. Shutter speed controls how long the camera’s sensor is exposed to light, affecting both exposure and motion blur. When used in combination with ISO and aperture, it plays a key role in achieving a well-balanced photograph.
 A shutter speed dial. Photo by Agê Barros.
Understanding Shutter Speed and ISO in the Sunny 16 Rule
Shutter speed refers to the length of time your camera’s sensor is exposed to light. It is measured in seconds or fractions of a second, with each step either doubling or halving the amount of light that reaches the sensor. In low-light conditions, a longer shutter speed is needed to capture enough light for a well-exposed image.
However, in the Sunny 16 Rule, there is already ample sunlight, meaning the shutter speed does not need to be slow. A faster shutter speed prevents excessive light from overexposing the image.
Why Use ISO 100 in Bright Conditions?
To understand why ISO 100 is ideal for bright outdoor settings, it’s important to know how ISO works. ISO represents the sensitivity of your camera’s sensor (or film) to light. The higher the ISO, the more sensitive the sensor becomes, requiring less light for a proper exposure.
ISO values typically start at 100 and increase in steps: 200, 400, 800, 1600, and beyond. Each step doubles the sensor’s sensitivity, meaning ISO 200 is twice as sensitive as ISO 100.
On a bright day, ISO 100 is sufficient to achieve a well-balanced exposure without the risk of overexposing the image. If you were to increase ISO to 200 while keeping the same shutter speed and aperture, the sensor would receive twice as much light, resulting in an overexposed image.
Mastering the Exposure Triangle
Now that we’ve explored how shutter speed and ISO work together, the final component of exposure is aperture. These three settings—shutter speed, ISO, and aperture—form what is known as the Exposure Triangle. Adjusting one setting requires a corresponding change in one or both of the others to maintain a properly exposed image.
But why not always use f/16?
The primary reason to adjust aperture is to control depth of field, which determines how much of the image is in focus. This is a crucial element of creative photography, allowing photographers to either keep an entire scene sharp or create a blurred background for subject isolation.
 A rock cairn captured with a shallow depth of field. Photo by Fritz Rehde.
Adjusting Aperture for Creative Control
Aperture plays a key role in controlling depth of field, which determines how much of an image appears sharp. For example, using a wider aperture such as f/4 instead of f/16 will result in a blurred background with more pronounced bokeh, making the subject stand out.
On the other hand, shooting at f/16 ensures that both the foreground and background remain in focus, which is ideal for landscape photography. However, for portraits or subjects that benefit from separation from the background, f/4 or wider can create a more professional and visually appealing effect.
Beyond creative control, adjusting the aperture also influences the amount of light entering the camera. A wider aperture lets in more light, allowing for a lower ISO and a faster shutter speed, which is especially useful in low-light situations. If conditions change and the Sunny 16 Rule no longer applies, adjustments are necessary to maintain proper exposure.
Adapting the Sunny 16 Rule for Different Lighting Conditions
Not every day is bright and sunny, and not all photos will be taken at f/16. To apply the Sunny 16 Rule in varying conditions, you must account for aperture changes.
If you adjust the aperture away from f/16, you need to compensate by making equivalent changes to shutter speed and ISO. For example, if you open the aperture from f/16 to f/11, you have increased the light by one step. To maintain the correct exposure, you should increase shutter speed or lower ISO by one step to balance the additional light.
By understanding these adjustments, you can confidently apply the Sunny 16 Rule even when lighting conditions change, ensuring consistently well-exposed images.
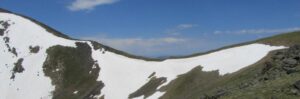
 The Sunny 16 Rule can be adapted to non-sunny days for exposure estimations. Photo by Filip Zrnzević.
Mastering the Sunny 16 Rule Through Practice
Perfecting the Sunny 16 Rule requires time and practice, as it involves memorizing the specific values of aperture, shutter speed, and ISO. These settings may seem complex at first, but with consistent practice, you will develop a natural understanding of how they interact.
To help with this, reference guides are useful for understanding aperture stops and their impact on exposure. Below is a breakdown of common aperture values and how they compare to f/16 in terms of light difference:
| Aperture | Stops from f/16 | Shutter Speed Adjustment | ISO Adjustment |
|---|---|---|---|
| f/16 | 0 stops (base) | 1/ISO (e.g., 1/100s at ISO 100) | Base ISO (100) |
| f/11 | +1 stop (more light) | Double the shutter speed (e.g., 1/200s) | Lower ISO if needed |
| f/8 | +2 stops | 1/400s | Lower ISO or faster shutter speed |
| f/5.6 | +3 stops | 1/800s | Lower ISO further if possible |
| f/4 | +4 stops | 1/1600s | Reduce ISO or increase shutter speed |
By understanding these exposure adjustments, you can quickly determine the correct settings for various lighting conditions. Practice shooting in different environments and adjusting settings manually to reinforce your skills. With time, these adjustments will become second nature, helping you achieve proper exposure in any scenario.
Adapting to Real-World Lighting Conditions
No lighting situation is ever truly perfect. Unlike photographers from the film era who relied on external light meters, today’s digital cameras come equipped with built-in light meters, making exposure adjustments much easier. However, if you choose to apply the Sunny 16 Rule, you may encounter varied lighting conditions that require slight modifications to achieve optimal exposure.
While the settings outlined earlier serve as a general guide, real-world scenarios often demand flexibility. You might need to adjust shutter speed, aperture, or ISO beyond the typical range to accommodate shadows, reflections, or changing weather conditions. These adjustments are commonly referred to as stops, which allow you to fine-tune your exposure for different lighting environments.
Mastering exposure takes practice, and the best way to improve is through hands-on experience. Don’t limit yourself to shooting only on bright sunny days—some of the most striking photographs are captured in rain, fog, and dramatic overcast skies. Experiment with different conditions, and soon, exposure adjustments will become second nature, helping you capture stunning images in any environment.