The “blue hour” is the time just before sunrise or after sunset when the sun remains below the horizon. It follows golden hour in the evening and precedes it in the morning. While golden hour is widely recognized for its ideal lighting in photography, blue hour is often overlooked despite its unique and stunning visual effects.
This guide will explain what blue hour is, when it occurs, and how you can make the most of it to enhance your photography.
Table of Contents
Understanding Blue Hour and Its Photographic Benefits
Like golden hour, blue hour doesn’t last precisely one hour. Its duration depends on factors such as location, weather conditions, and the time of year. Typically, blue hour occurs about 30 minutes before sunrise and after sunset, when the sky takes on a distinct blue hue. There is no universally agreed-upon start or end time, but some sources suggest that blue hour concludes when nautical twilight begins, which happens when the sun is 12 degrees below the horizon.
On a scientific level, blue hour occurs due to a phenomenon known as Chappuis absorption. This process happens because red light wavelengths pass through space more easily, while shorter blue wavelengths scatter in the atmosphere. As a result, when the sun is just below the horizon, predominantly blue light reaches the Earth’s surface, creating the distinct cool tones of blue hour.
For photographers, blue hour is especially appealing because of its soft, atmospheric lighting. With no harsh shadows and a relatively low dynamic range, it provides an ideal setting for capturing moody and dramatic images. While golden hour is known for its warm and inviting glow, blue hour often conveys a cooler, more mysterious ambiance. Another key advantage of shooting during blue hour is the quieter environment—popular locations tend to be far less crowded than during golden hour, offering a more relaxed and creative atmosphere for capturing stunning shots.
A final advantage of blue hour is that it is less dependent on weather conditions than golden hour. While golden hour relies on direct sunlight to create its signature warm, glowing effect, blue hour remains visually striking even on cloudy days. In fact, cloud cover can enhance the mood of blue hour photography, adding depth and texture to landscapes, making it an excellent time to capture unique and atmospheric images.

Timing of Blue Hour: When Does It Occur?
Blue hour is even less precisely defined than golden hour, as neither follows a strict time of day. Generally, it occurs about 30 minutes before sunrise and after sunset, but to ensure you don’t miss it, it’s best to allow for extra time. You can easily check sunrise and sunset times for your location with a quick online search. However, since these times vary by location, it’s essential to account for differences when traveling.
For a more convenient approach, photography planning apps like PhotoPills and The Photographer’s Ephemeris (which also has a web version) provide daily sunrise, sunset, and blue hour times. These tools can help streamline your planning and ensure you arrive at the right moment.
Keep in mind that different apps use slightly different metrics to determine when blue hour begins and ends, so it’s wise to allow some flexibility in your schedule.
Pro Tip: If you’re interested in capturing the moon during blue hour or doing astrophotography at night, most planning apps also provide detailed information on the moon’s position and star locations at various times.
Tips for Capturing Stunning Blue Hour Photography
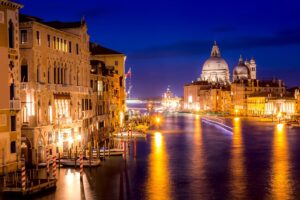
- Balance Cool and Warm Tones: Use artificial lights to create contrast in your images. Whether it’s a glowing city skyline or a subject illuminated by a headlamp, there’s a brief moment during blue hour when artificial lights perfectly match the natural brightness of the scene. Capturing this balance can result in some of the most breathtaking images that are unique to this time of day.
- Preserve the Shadows: Avoid overexposing your shots. The beauty of blue hour lies in its deep shadows and moody tones, which can be lost if an image is too bright. While exposure is a creative choice, keeping your settings slightly darker than usual will help maintain the distinct atmosphere that makes blue hour photography so special.

Enhance Your Blue Hour Photography with These Techniques
- Experiment with Long Exposure: Blue hour is an excellent time to practice long-exposure photography. It’s dark enough to use shutter speeds of several seconds while still allowing visibility of your surroundings and camera settings. Subjects like moving water, drifting clouds, passing people, celestial bodies, and city lights can create stunning effects with long exposure. To achieve sharp, blur-free results, a tripod is highly recommended (see the next tip).
- Use a Tripod for Stability: As blue hour progresses, lighting conditions become dimmer, making it challenging to shoot handheld without increasing ISO. Using a tripod allows for longer shutter speeds while maintaining sharpness, reducing noise, and capturing the depth and clarity that make blue hour images so striking. It also enables you to explore creative long-exposure techniques with ease.
Master Bulb Mode for Extended Exposures
- Explore Bulb Mode: In some cases, blue hour lighting may be too dim for standard long exposures, especially if you’re using a narrow aperture and the lowest ISO setting. Most cameras have a maximum shutter speed of 30 seconds, which may not always be enough. If you need a longer exposure, bulb mode allows you to keep the shutter open for as long as the shutter button is pressed. This feature is especially useful for capturing extremely low-light scenes with rich detail. For best results, use a remote shutter release or a timer to avoid camera shake during the exposure.
Elevate Your Blue Hour Photography with Creative Intent
- Consider the Mood: Blue hour’s cool, even lighting creates a distinct atmosphere that can evoke a range of emotions—calmness, mystery, melancholy, or even an eerie sense of solitude. Be intentional about capturing these moods in your photos. Challenge yourself to explore different emotions through composition, lighting, and subject choice to fully embrace the unique character of blue hour.
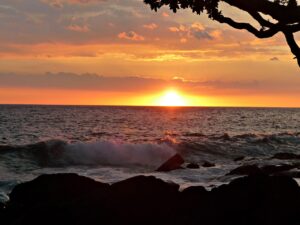
- Take Advantage of Golden Hour Too: If you’re already on location, maximize your time by photographing both golden hour and blue hour. Arriving early for sunset or staying late after sunrise allows you to capture a stunning range of lighting conditions. Even if you don’t take more photos, simply watching the transition of colors can be an inspiring experience.

Essential Tips for Editing Blue Hour Photography
- Understand the Histogram: During blue hour, preserving shadows is key to maintaining the scene’s natural depth and mood. Instead of relying solely on your camera’s LCD screen, use the histogram to assess exposure accurately. This graph displays the tonal distribution in your image, helping you determine whether it’s too bright or too dark without unnecessary guesswork.
- Maintain the Blue Hour Aesthetic with White Balance: Blue hour’s signature cool tones are part of its unique charm. While adjusting white balance during editing, avoid warming up the image too much—let the natural blue hues shine through. While you have creative freedom, embracing the cooler tones will enhance the authenticity and mood of your blue hour shots.

Advanced Editing Techniques for Blue Hour Photography
- Use Graduated Filters and Local Adjustments: In cityscapes and other high-contrast scenes, different parts of your image may have varying brightness levels. Graduated filters and localized adjustments help balance exposure without affecting the entire image. While this technique is more commonly used for golden hour photos, it can still be beneficial for refining blue hour shots.
- Subtle Vignetting for Mood Enhancement: A light vignette can subtly enhance the mood of your blue hour images, adding depth and focus. However, moderation is key—overdoing it can make the photo look unnatural or distracting. When in doubt, apply a gentle vignette to maintain a professional and polished look.
- Check and Enhance Sharpness: Blue hour often requires slower shutter speeds, increasing the risk of motion blur—especially if you’re shooting handheld. Always zoom in to check for sharpness, and if needed, use sharpening tools in editing software like Adobe Lightroom or Topaz Sharpen AI to refine details. This step is especially important if you plan to print your image at a large scale.
Conclusion
Often overshadowed by golden hour, blue hour offers a distinct and captivating atmosphere for photography. Its unique lighting conditions create moody, cinematic scenes that are perfect for a variety of genres, including portraits, landscapes, cityscapes, and even astrophotography. If you’re already planning to shoot a sunrise or sunset, consider arriving early or staying late to take advantage of blue hour’s creative potential. As an added benefit, it typically draws fewer crowds, allowing for a more peaceful and immersive shooting experience. With the right approach, blue hour can yield stunning, one-of-a-kind images that rival even the most breathtaking golden hour shots.