Mastering Manual Mode: A Beginner’s Guide
P.Zasada
In a world driven by automation, photography remains one of the few arts that demand awareness, engagement, and control. While manual mode may seem daunting at first, it offers unparalleled creative freedom, precise exposure in challenging lighting, and a deeper connection to the photographic process. With practice, shooting in manual mode can elevate your skills and help you create your most compelling images.
Here’s a step-by-step guide to mastering manual photography, from fundamental concepts to advanced techniques.
Table of Contents
What is Manual Photography?
At its core, manual photography is the foundation of all photography. It’s how images were captured from the very beginning—long before digital advancements. For generations, both amateur and professional photographers relied on metering a scene and adjusting their settings manually. In many ways, shooting in manual mode with a digital camera brings us back to the film era, where every shot required careful consideration.
Over time, cameras evolved to include built-in light meters, and by the 1970s, autoexposure modes became standard. These features were further refined, making automatic shooting accessible to everyone. By the 1980s and 1990s, affordable point-and-shoot cameras made photography effortless, allowing anyone to take pictures with minimal technical knowledge. Today, smartphones dominate casual photography, offering instant, automated results. However, this ease of use makes manual photography even more appealing for those seeking artistic control and technical mastery.
Why Shoot in Manual Mode?
For serious photographers, manual mode is an invaluable tool. It provides complete control over exposure settings, ensuring that each image is captured exactly as envisioned.
Understanding how aperture, shutter speed, and ISO influence an image allows photographers to make precise adjustments, especially in challenging lighting conditions where automatic modes may struggle. Moreover, mastering manual settings enhances a photographer’s ability to use semi-auto or full-auto modes more effectively when needed.
Ultimately, your camera is a tool meant to serve your creative vision. Since photography is fundamentally about capturing light, a deep understanding of exposure is essential. Manual mode forces photographers to engage with these principles, leading to greater confidence and creative freedom in every shot.
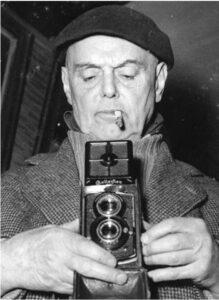
Photographer Robert Doisneau, 1947. Photo: Creative Commons
Another compelling reason to step away from Auto mode is that manual photography embodies the true essence of the craft. Beyond mimicking the film photography experience, shooting in manual requires a deeper level of engagement. It encourages photographers to carefully analyze a scene, evaluate lighting conditions, and make intentional decisions about focus and depth of field. This hands-on approach fosters a stronger connection with the creative process.
Slowing down to compose and capture an image thoughtfully almost always leads to better results. Over time, manual shooting becomes second nature—what initially feels slow and deliberate turns into an instinctive workflow. The process becomes fluid: identify the subject, meter the light, set the correct exposure, focus, shoot, and move forward with confidence.
Where to Start?
The foundation of manual photography lies in understanding exposure. At its core, exposure is a balance between intensity and time—the amount of light reaching the camera’s sensor and the duration it is allowed to do so.
- Aperture (measured in f-stops) controls intensity by determining how much light passes through the lens.
- Shutter speed controls time, determining how long the sensor is exposed to light.
- ISO represents the sensor’s sensitivity to light. A higher ISO increases sensitivity but may introduce digital noise or grain, affecting image quality.
Mastering manual photography is essentially learning to balance these three elements. By understanding how they interact, photographers gain the freedom to create images exactly as they envision.
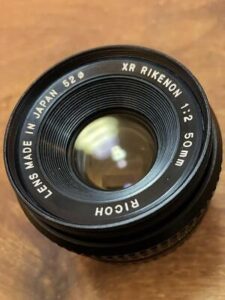
The blades of a lens open and close to create aperture. Photo by nayukim and licensed under CC BY 2.0.
One of the greatest advantages of shooting in manual mode is the ability to prioritize specific elements within a photograph. Do you want a shallow depth of field for subject isolation? Are you aiming for a precise exposure in difficult lighting conditions, such as silhouettes or bright snow scenes? Do you prioritize sharpness or intentional motion blur? Since even the most advanced cameras fall short of the human eye’s adaptability, photographers must make intentional choices. This is why manual photography begins with determining the most critical element of the shot and adjusting settings accordingly.
Manual Mode for Beginners
In most situations without fast-moving subjects, such as wildlife or children playing, aperture often takes priority in manual photography. If the subject remains still, selecting a desired f-stop first allows photographers to manage exposure by adjusting shutter speed and ISO. For beginners, using auto ISO at first can help ease the learning process while focusing on coordinating aperture and shutter speed.
How to Start Shooting in Manual Mode
1. Evaluate the Shot
Metering sometimes requires both eyes. Photo by Max Sat via Creative Commons.
Before adjusting your settings, take a moment to assess your subject—whether it’s a person, a landscape, or an object. What needs to be in focus, and what should be blurred?
A small aperture (high f-stop, such as f/16) increases depth of field, keeping both the foreground and background in focus. However, using a smaller aperture reduces the amount of light entering the camera, requiring a slower shutter speed to compensate. This can lead to motion blur or camera shake unless you use a tripod. Alternatively, increasing ISO can help, but at the cost of introducing digital noise or graininess to the image.
On the other hand, a large aperture (low f-stop, such as f/2) allows more light to reach the sensor, enabling a faster shutter speed and lower ISO. This setting is ideal for creating a shallow depth of field, where the subject remains sharp while the foreground and background blur into a pleasing effect known as bokeh. However, using too wide an aperture can unintentionally soften important details, making proper focus and depth of field essential for a successful shot.

2. Meter the Light
Switch your camera to Manual mode and select an aperture based on your desired depth of field. Your camera’s built-in light meter will indicate where to set the shutter speed for what it considers a proper exposure. Start by aligning the exposure meter at zero, take a test shot, and review the image on your camera’s rear screen. If the photo appears too bright (overexposed) or too dark (underexposed), adjust either the aperture or shutter speed until you achieve the best result.
3. Mastering Manual Adjustments
Once you’ve determined the correct exposure—keeping in mind that it may differ from the camera’s recommended settings—start experimenting. For instance, if your proper exposure is f/8 at 1/250s, you can adjust the settings while maintaining exposure balance.
- Changing the aperture to f/5.6 (allowing more light) requires increasing the shutter speed to 1/500s (letting in less light).
- Adjusting to f/11 (reducing light) requires slowing the shutter speed to 1/125s (allowing more light).
Test different combinations and observe the results. You can also repeat this exercise with shutter speed adjustments while keeping the aperture constant. This hands-on practice is essential for mastering manual photography.
4. Understanding the Reciprocal Rule
A key consideration when adjusting settings is avoiding blur caused by camera shake. A simple guideline, known as the reciprocal rule, helps determine the minimum shutter speed needed for sharp images:
Shutter Speed ≥ 1 / Focal Length
For example:
- When using a 50mm lens, the shutter speed should be at least 1/50s to reduce blur.
- With a 200mm lens, a minimum shutter speed of 1/200s is recommended.
This rule serves as a baseline, but using a faster shutter speed can enhance sharpness. While adhering to this principle may limit aperture adjustments—preventing you from using f/16 or f/22 in some cases—it ensures your images remain crisp rather than looking as if they were taken during a bumpy car ride.
5. Try Bracketing
Bracketing can help refine your exposure more efficiently. When enabled, your camera captures three consecutive shots: one underexposed, one correctly exposed, and one overexposed. This method allows you to compare results and select the best exposure for the scene.
However, by manually adjusting aperture and shutter speed as described above, you’re already practicing a form of manual bracketing—fine-tuning exposure with complete control. See? Shooting in Manual mode isn’t as difficult as it seems. With practice, it becomes second nature, giving you the freedom to capture images exactly as you envision them.
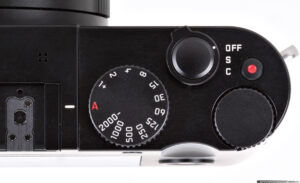
Manual settings on a modern camera body. Photo: Leica.
6. Advanced Manual Photography
Once you’ve mastered balancing exposure, it’s time to take your manual photography skills to the next level. One way to advance is by relying less on your camera’s light meter and applying the Sunny 16 Rule—a classic technique that helps you estimate exposure based on available light.
Once you determine the correct exposure for a given lighting condition, keep it locked in until the light changes. Unlike semi-automatic modes, where the camera continuously adjusts settings, Manual mode ensures complete consistency. This allows you to quickly experiment with different aperture and shutter speed combinations without interference.
At this stage, incorporating manual ISO settings completes the exposure triangle. Increasing ISO makes the sensor more sensitive to light, allowing you to stop down the aperture and use faster shutter speeds. Alternatively, you can treat ISO like traditional film—choosing a single setting for an entire shoot. This approach forces you to refine your control over aperture and shutter speed, sharpening your skills in adapting to available light.
7. Creative Applications of Manual Mode
Manual shooting is especially valuable in artistic photography. High-key and low-key images, for example, can be achieved by deliberately overexposing or underexposing parts of a scene—something easily controlled in Manual mode.
Additionally, consider switching to manual focus while in Manual mode. This enhances your ability to assess focus and depth of field precisely. Professional photographers often use hyperfocal distance to maximize sharpness in landscape photography, another skill that becomes second nature with manual practice.
8. Conclusion
At its core, mastering Manual mode is about understanding exposure. Like composition, achieving the perfect exposure takes time and practice, but it’s a skill that will elevate your photography.
Modern digital cameras provide valuable tools for learning manual settings. The rear LCD screen offers instant feedback—allowing you to analyze exposure, focus, and sharpness in real time. With today’s SD cards capable of storing thousands of images, there’s no reason not to experiment and refine your technique.
Even experienced photographers may use semi-automatic modes like Aperture Priority, but they always know how to shoot manually when needed. Some scenes require it, while other times, it’s simply a chance to slow down, immerse yourself in the moment, and make intentional creative choices.
Ultimately, shooting in Manual mode lets you reclaim full control, ensuring your photos reflect your artistic vision—not just the camera’s best guess.